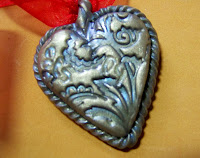


I have been making Natasha beads for years, but recently stumbled upon a tutorial called Elissahearts by Elissa Powell, which detailed how to use this technique for creating one of a kind heart shaped jewelry. I took that technique and changed it slightly, since that tutorial calls for molding your heart in a 3 d heart mold and I didn't have one--actually I later found that I did but I like my clay cutter heart shape better with a flat surface front and back, because I wanted to add to the design. I further changed the technique by adding decorative frames to the hearts and making them look more decorative.
Here's the process: Take different colors of clay--scraps are fine. Include some cane pieces if you have them, because it will increase the complexity of the design. Twist the colors together and try to have contrasting colors adjacent to each other for more impact. Once you have twisted them all together, roll them into a ball and then further refine the shape into a teardrop shape. Slightly flatten the front and back of the tear drop with the heel of your hand. Cut through the center of the teardrop with your clay blade, open it up and make the inner cut surfaces the new face of your heart. You have two possibilities here and I would try positioning the two heart halves with the two different mirror image edges together to see which one you like best. If you don't like the design, simply push the two halves back together, twist, and shape and cut again until you get something you like. If it gets too muddy, add more clay. Try to get your mirror images to line up perfectly and then put a little baby powder on your finger and smoothe out the seam.
Some of the accidental pictures that you get with this technique are pretty startling. My favorite so far is the face that appeared on a heart I used on a Christmas ornament, which is pictured here.
Now for the frames: I condition a sheet of metallic clay on #1 setting on the pasta machine and select a texture sheet to use for the back of the frame. I apply baby powder to the texture sheet and thump the back of it to remove the excess (and yes, my workspace floor is a little dusty right now from this activity!) and then lay the clay sheet on the work surface, apply the texture sheet and press it down and then use my roller to further impress the design into the clay. I then take my raw heart and lay gently on the texturized sheet and cut around the heart leaving about a 1/8 inch margin on all sides. I use a knitting needle to smoothe the edges of the texturized sheet against the sides of the heart. Next, I take the scraps left over from the texturized sheet, and roll and roll them into a cylinder until I get a nice tight cylinder with no air bubbles and place this in my extruder gun and extrude a triangle shaped snake which I can then coil into a decorative border for my frame. Once I get the border evenly twisted, I lay it gently around the heart to determine where to cut the two edges to get it to match up for a perfect fit around the edge of the frame. I smoothe it gently against the edge of the heart and the textured frame piece and hold it up to the light to make sure I have a good seal all the way around. I then take another slice of the twisted snake to make the bail for the pendant. I slice the ends diagonally for a nice fit against the front and back of the pendant. I smoothe in place with my knitting needle tool, add my initials and the date to the back of the piece, twist the bail slightly (this is just my preference) and we are ready to bake!
Because the frame is texturized, mica powders can be added for additional interest, and when you sand the finished, baked pendant, only the stamped depressions in the clay will retain the mica powder finish. I have included a photo of a pendant frame using Pearlex powder. This frame technique also lends itself well to mica shift, because you are using metallic clay and a texture sheet which re-aligns the mica particles in the clay. My most successful use of mica shift with these hearts so far was on a piece that I impressed and then went over gently with a roller to reduce the amount of relief between the raised and depressed areas. By doing this step, I was able to just sand away the raised portion after baking and got a very nice ghost image which is also pictured here. It is the top right photo.


No comments:
Post a Comment