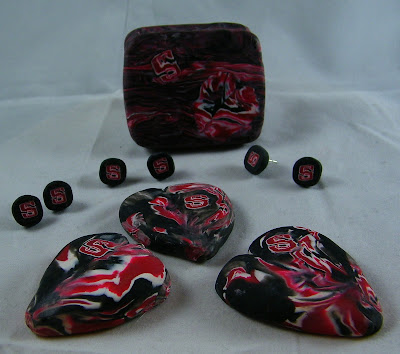
I have been meaning to explore polymer cane work using a team spirit theme for quite awhile now. I knew it might not be simple, since anything one tries for the first time seldom is. My idea was to use extruded polymer strips to craft a simple NCSU letter cane. In order to make it work, I had to analyze the entire logo and calculate just how many thin flat strips and thin round snakes it would take and in what combination to make the design approximate the slick version of the university logo,
I started by searching the internet for free dowloadable software that would convert a photo to a cross-stitch graph, because this seemed like a good way to replicate a colored graphic representation. After I got the graph and reduced it to a size I could use, I decided to also print out a copy of the original logo--also the same size as the original cane I planned to construct. This was useful because I couldn't really get the detail I wanted with the cross stitch graph unless I wanted to work on an extremely large scale. The photo worked well, because I could craft a three dimensional cane shape component and then match the edges to the photo to check for size and shape. It was also helpful that the big "S" shape is fairly symmetrical and I was able to use my strategy for making different parts of the "S" more than once, which saved time. The most difficult part was the small "N" and "C" and how they fit into the top and bottom of the "S". Once the entire "S" with embellishments was constructed, it was time to reduce the cane. I used Sandra McCaw's technique for standing the cane on end and pushing in on the sides from bottom to top, which helped cut down on the amount of distorted cane. I also used the technique of stroking the cane and pulling and stretching and twisting the cane as shown in Sarah Shriver's and Jana Roberts Benzon's dvd's.
Having already done some work with constructing intricate canes and reducing them with the fine tutorials produced by these three polymer clay artists definitely helped me to develop strategies for constructing this logo cane and I thank them all. I would probably never have attempted this design adventure had I not studied the wonderful techniques taught by these artists beforehand. Sarah Shriver's advice on analyzing a graphic design and breaking it down into its component parts was especially helpful. Jana Roberts Benzon's techniques for altering a graphic design were useful when my logo got a little distorted. I wasn't afraid to wedge in corrective bits of color to even out the graphics.
Once the cane was constructed and I had reduced cane sections to different sizes it was time to come up with some finished product. Even with all the care I took with the cane reduction, I still ended up with some distortion at the ends, so I used the distorted parts to make natasha beads. I took slices off one of the natash beads and rolled them through the pasta machine to make a skin for coverin a gift tin. Then I took a second natasha bead, rolled it into a teardrop and then cut it open to make a heart shape and then sliced the top layer from the heart to use as a veneer design on top of the gift tin opposite the "S" logo.
Next I made some Natasha bead hearts with some of the leftover cane scraps and some additional black clay and then once they were constructed, I added thin slices of the "S" logo to both sides. That way, no matter how they are worn, the logo is present. The front of the Natasha bead hearts is always quite intricate because you get that mirror image rorschach effect from slicing open the teardrop. The back of the heart has to be smoothed together, and since I was using a mixture of translucent and solid color premo for each color, the smoothing resulted in an accidental glass like effect with a lot of transparency and depth.
The best thing about this project was the way I was able to pull together what I had learned from three different tutorials and my previous explorations with Natasha bead hearts and roll all of that experience into a new idea.
Ring in the Pantone's Color of the Year!
-
Happy New Year everyone. I like to generally start out the year exploring
new clay colors and mixing up some of the Pantone color recipes. Pantone
actu...
4 days ago


No comments:
Post a Comment