


Quilt art has metamorphosed into such an art form that some pieces are barely recognizable as textiles at all and closely resemble paintings and mixed media works. I decided that it was worthwhile to explore the possibilities of using quilting processes to design works in polymer clay. I knew there would be issues since clay and fabric are two very different things and while a flat piece of fabric approaches two dimensionality, most clay does not.
I began at the bookstore looking for a quilting book and finally decided on a magazine just because I didn't know whether I would have success translating the techniques and quilt block templates to polymer. It seemed that this process should be possible, since I know that Sarah Shriver and other polymer artists had their beginnings in textile arts and some of their techniques could lend themselves to quilting. I started out by making sheets of clay in the colors that I wanted to use. I marbled some green and yellow clay for one of my colors to try to mimic fabric a little more closely and to provide a little visual excitement in the piece. The colors I chose were a royal red, a dark violet, and two shades of green. I started out by making the quilt block cane that I needed to morph the pinwheel blocks. This square block had to be cut on the diagonal on all four sides, resulting in a smaller block with a different design which could then be combined into yet a different quilt block. I made up quilt squares with red and purple pinwheels. It was now time to make the quilt. It occurred to me that I could make a nice box covered in the squares, possibly a small purse ( I do have a book by Judy Belcher which details this technique) or I might even make earrings.
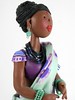
After some experimentation which trashed some of the quilt squares, I decided on a bib necklace. I know that at first thought a quilt square bib seems a little over the top. I convinced myself that the pinwheels were round and that a bib would probably look fine. I made a bib form out of Sculpey Ultralight and worked and worked the clay to get an even outline for the bib. I only covered one side of the bib to allow for contracting clays and the escape of air bubbles. The hardest part was smoothing the premo over the Ultralight without distorting the shape.of the bib pendant and without trapping air bubbles underneath. I did have to do a lot of smoothing with my fingers covered in baby powder to get things to work and I had to re-shape the pendant a couple of times.
Next time the Ultralight will get fired first and then the outer skin will be applied. It works much better for me if I have a rigid surface on which to smooth the Premo. I drilled two holes--one at either end to attach the bib to the sides of the necklace and baked the pendant for 30 minutes at 275 degrees. After plunging the pendant into some very cold water to cool it off and harden the surface of the skin, I covered the back of the pendant in some green textured clay and stamped my name into the design. A very kind person explained to my Guild how to make your own name stamp out of a discontinued credit card! So this is the first piece that I have stamped that way. After sanding the bib with 5 increasingly finer grades of wet-dry paper and then buffing, I was ready to work on the rest of the design. I decided that I needed some kind of coordinated beads to go with the bib and decided on button forms with multicolored aluminum rings inserted and covered for a very "covered button" effect. The buttons were made using a lentil bead technique where you start with a ball of multicolored clay (although solid clay could be used) and begin rolling the ball in a spiral path under a slanted piece of glass or plastic. Eventuallly you get to a bicone bead shape. Then it is an easy matter to keep swirling the glass around on the clay until you get a lentil shape with a lovely swirl design on both sides. I flattened the tops for a more covered button look.
I had originally planned to make this into another chain maille piece since I sold one of my first two chain maille necklaces this weekend. I began to make the chain maille and ran into all sorts of problems with the design. It occurred to me that maybe all I needed was ribbon. Ribbon is so popular for bib necklaces that I felt sure that it would be the best choice. Then I wanted to break up the lines a little bit instead of just having straight ribbon climbing the neck. So I pushed red pleated Offray ribbon through the holes and hand stitched the edges of the ribbon together on each side to secure the bib. Next, I added the two largest of the four "button" shapes and tried on the necklace in front of a mirror to adjust the placement and make sure that I was getting the "look" I wanted. It seemed that the ribbon wanted to curl around the edges so I decided to make the necklace look wider by tacking the edges of the ribbon on either side of the "buttons to force the ribbon into a more flared look.
Next it was time to design a fastener. I had the other two "buttons" and wished to fashion a fastener out of them. I thought about rubber cord for a loop for one of the buttons but didn't know where to get some around here, so I decided to make a loop out of multi-colored aluminum jump rings--the same ones originally intended for the chain maille. This experimentation resulted in a very nice fastener made from clay and aluminum chain maille with the ribbon ends once again turned under and hand stitched into place. I have never seen a fastener like this before, but there probably is one somewhere. For a little added sparkle, I added purple rhinestones in two different sizes--large for the bib and smaller for the buttons. Most bibs have rhinestones or other sparkly gems and I didn't think this necklace would want to be left out. This required working with Super Glue, which is always a challenge for me!
I was so happy to finally get this necklace finished in time for the PCAGOE challenge. My work was delayed because I was a vendor on this past Saturday at an event in Charlotte, NC and I had to spend most of the week getting ready for that. We didn't get home until early Sunday morning, so that didn't leave me much time. Luckily, the pendant and the buttons were made last weekend and only needed to be put into a design--that was the hard part. I got my submittal in with about 2-5 minutes to spare! Too close to the wire for my taste--well, maybe I secretly like living on the edge! Who knows?
I learned some very good things from designing this necklace. If I had used about 2-3 inches of the original block cane and had cut and re-combined the entire cane into the final block and then sliced my individual finished quilt squares I would have been able to keep my block design more uniform and less distorted. Distortion isn't always a bad thing, and the very distortion in the squares lent a nice, breezy feel to the piece with the pinwheels having a slightly wavy line very similar to what you might see with fabric blowing in the wind. I made up a technique for working with Super Glue to avoid getting it all over my fingers and the sides of the rhinestones. I cushioned the loops of the button rings into the clay scraps to secure the buttons and then rolled up scraps of loose clay to add to the top of the rhinestones. Having this leverage made it much easier to apply the glue and fit the pieces together without gluing myself! I designed a new fastener with a looped chain and double button design. And I learned about fitting together square components of clay to form a quilt block that can then be modified into yet another block for a totally amazing design.
All in all, it was a very exhilarating learning experience and I can't wait to try some more quilt blocks. Earrings, anyone?


No comments:
Post a Comment